There is a specific kind of magic in a warm cinnamon roll the way the center stays soft, the way the icing melts into the spirals, and that unmistakable aroma of toasted cinnamon. For many of us in the gluten free community, we’ve spent years thinking that magic was off limits. Most Gluten Free Cinnamon Rolls on the market are dry, crumbly, or worst of all grainy.
If you’ve ever felt like you were “gambling” with your ingredients when yeast is involved, this recipe is your sure thing. These are the best gluten free cinnamon rolls you will ever make: pillowy, rich, and so decadently gooey that even your non-GF friends will be reaching for a second one.
I used to be terrified of gluten free yeast dough. I remember a snowy morning when I spent hours on a batch, only for them to come out of the oven looking like flat, sad crackers. I almost gave up on cinnamon rolls entirely. But then I realized that GF dough doesn’t want to be treated like wheat dough it needs more love, more moisture, and a much gentler touch. When I finally pulled this specific version out of the oven and saw that “squish,” I actually did a little victory dance in my kitchen. Now, these are my go to for every holiday morning.
What Makes These Gluten Free Cinnamon Rolls “The Best”?
We aren’t just making a substitute; we are making a masterpiece. This recipe focuses on the three pillars of a perfect Gluten Free Cinnamon Rolls:
- The “Cloud-Like” Crumb: We use a high-moisture dough technique that prevents the “gritty” texture common in gluten free baking.
- The Liquid Gold Filling: A generous swirl of cinnamon and brown sugar that caramelizes as it bakes, creating a gooey, sticky center.
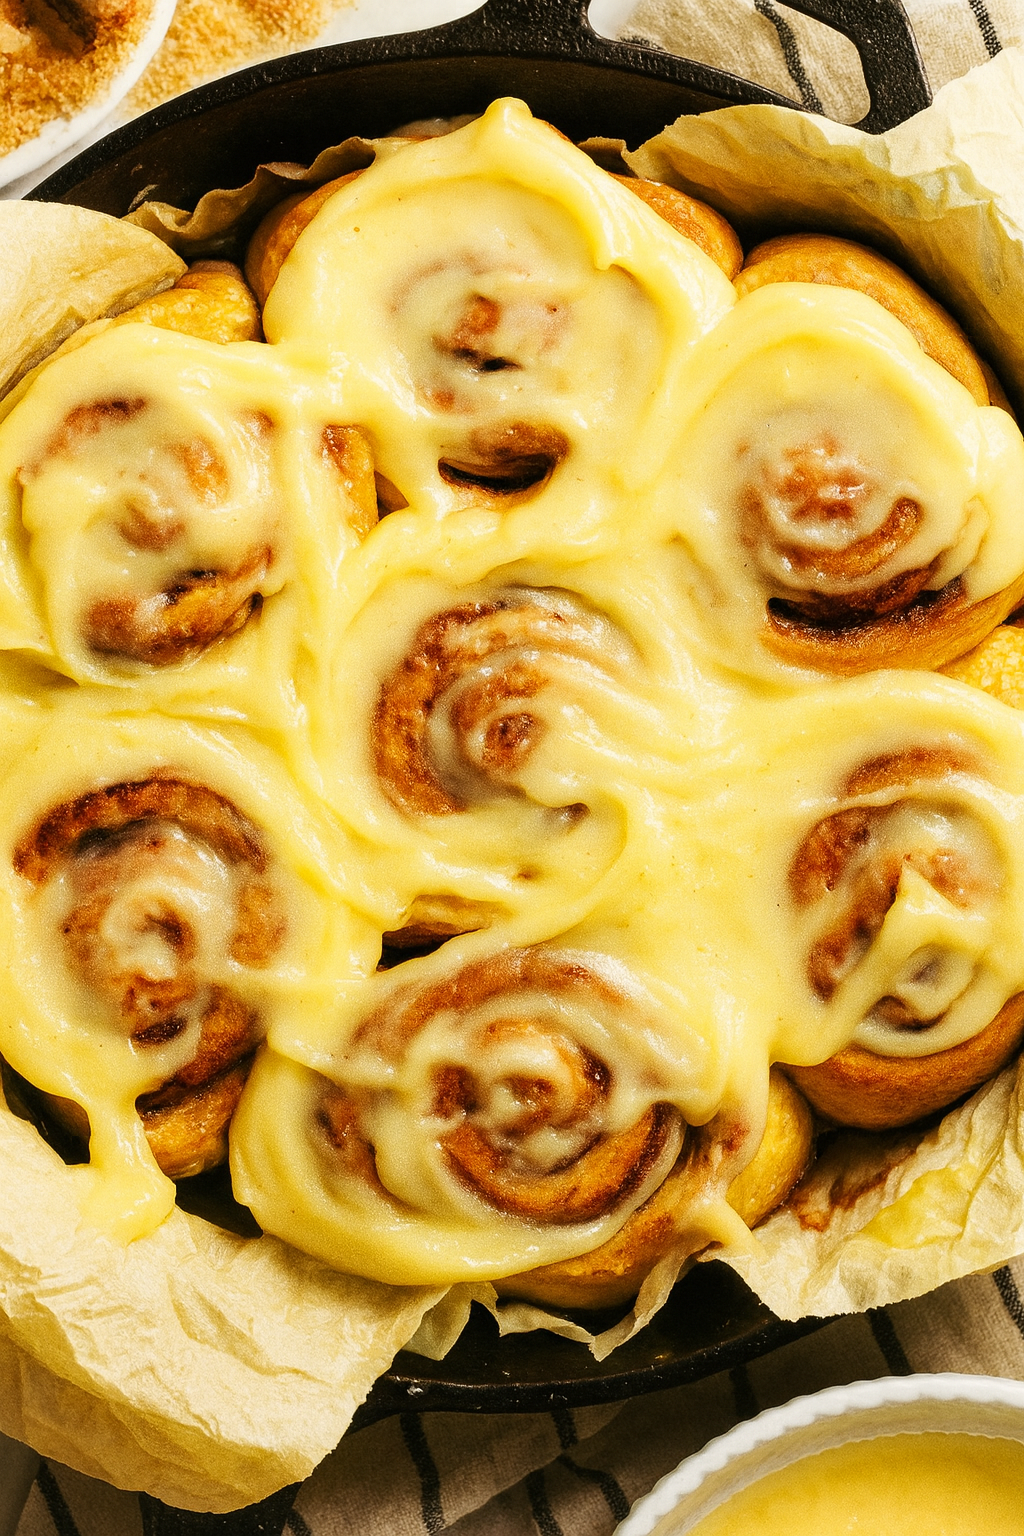
- The Vanilla Bean Finish: Instead of a basic sugar glaze, we top these with a thick, creamy vanilla bean frosting that balances the spice perfectly.
- Inclusive Baking: With a simple dairy free swap included, these rolls are perfect for sharing with everyone at the table.

What Makes These Gluten Free Cinnamon Rolls a Game Changer?
When you’re baking gluten free, you usually have to compromise on either texture or time. Not with this recipe. I’ve refined this process to make sure it feels like a classic baking session, not a science experiment. Here is why you are going to fall in love with these rolls:
- Authentic Bakery Style Texture: We’ve all had those Gluten Free Cinnamon Rolls that feel like wet sand or a heavy sponge. These are the exact opposite. They are soft, bouncy, and airy, providing that satisfying “pull-apart” experience you expect from a high-end bakery.
- The “One Bag” Secret: You don’t need to clear out the health food store to make these. This recipe is optimized for Bob’s Red Mill Gluten Free Bread Mix. Using a pre-balanced mix means the hard work is done for you no need to measure out five different flours and binders.
- A Familiar, Easy Process: If you’ve ever made traditional cinnamon rolls, you’ll feel right at home. We mix, roll, slice, and rise just like the original version. I’ve removed the “mystery” from gluten free yeast baking so you can bake with confidence.
- Inclusive for Everyone: These are easily adapted for my dairy free friends! By simply swapping in vegan butter and dairy free cream cheese, you get a result that is just as rich and decadent as the dairy version.
Ingredients You’ll Need For Gluten Free Cinnamon Rolls :
For the Dough
- 1 (16 oz) bag Bob’s Red Mill Gluten Free Bread Mix (discard yeast packet)
- ½ cup (100 g) granulated sugar
- 4 ½ tsp (2 packets) instant yeast
- 1 ½ tsp baking powder
- ½ tsp baking soda
- 1 tsp kosher salt
- 1 ¼ cups (300 g) water
- ½ cup (110 g) unsalted butter, sliced into tablespoons (sub vegan butter for dairy-free)
- 1 tsp apple cider vinegar
- 1 large egg + 1 egg white (sub vegan egg replacer if making vegan)
- Cornstarch, for dusting
For the Gluten Free Cinnamon Rolls Sugar Filling
- 6 tbsp unsalted butter, very soft (sub vegan butter if needed)
- ½ cup (100 g) light brown sugar, packed
- 2 tbsp ground cinnamon
For the Vanilla Bean Cream Cheese Icing
- ¼ cup (55 g) unsalted butter, room temperature (sub vegan butter if dairy-free)
- 4 oz cream cheese, room temperature (sub vegan cream cheese if dairy-free)
- 1 ½ cups (170 g) powdered sugar
- 1 tsp vanilla bean paste (or vanilla extract)
Step by Step Instructions, Gluten Free Cinnamon Rolls :
Baking with gluten free yeast dough can feel intimidating, but the secret is all in the “stretch.” Unlike wheat dough, we aren’t developing gluten; we are building a structure that can trap air. Follow these steps for that legendary “pull-apart” texture.
1. Create the Stretchy Dough
- The Dry Base: In your stand mixer, combine the bread mix (discard that yeast packet that comes in the bag!), sugar, instant yeast, baking powder, baking soda, and salt. Whisk for about a minute to ensure the leavening agents are perfectly distributed.
- The Warm Emulsion: Warm your water, butter, and vinegar. You want it warm to the touch (like baby bath water), but not hot enough to kill the yeast.
- The 5-Minute Rule: Once you add the egg and egg white, turn that mixer up to medium-high and let it go for a full 5 minutes.
When I first made these, I stopped mixing too soon because the dough looked “wet.” I quickly learned that gluten free dough needs those 5 minutes of high speed mixing to become smooth and stretchy. If you skip this, your Gluten Free Cinnamon Rolls will be crumbly rather than pillowy! Let it rest for 10 minutes afterward to settle.
2. The “No Stick” Rolling Method
- The Counter Hack: Lay down a large sheet of plastic wrap and dust it generously with cornstarch. This is a lifesaver for moving the dough later!
- Shape it Up: Roll the dough into a large 13×19” rectangle. Take your time here to ensure the thickness is even this ensures every roll in the pan bakes at the same rate.
3. Loading the Flavor (The Filling)
- Butter is Key: Mash your softened butter until it’s like a spreadable cream. Apply a thick, even layer across the entire rectangle.
- Sugar & Spice: Sprinkle your brown sugar over the butter and pat it down gently so it “sticks.” Finish with a generous dusting of cinnamon.
4. The “Floss Trick” for Perfect Slices
- Roll it Tight: Use the plastic wrap to help you roll the dough into a tight log.
- The Clean Cut: Forget the knife! Using a knife even a sharp one usually squishes the delicate layers of gluten-free dough.
Use a piece of unflavored dental floss. Slide it under the log, cross it over the top, and pull quickly. It “snaps” through the dough, leaving you with perfectly round, beautiful spirals every time.
5. The Proof & Bake
- The Warm Rise: Arrange your 7 rolls in a parchment-lined skillet (one in the center, six around it).
- The “Oven Trick”: To get the perfect rise, I preheat my oven to the lowest setting, then turn it off. Place the rolls inside for 45–60 minutes. They should look doubled in size and touch each other slightly.
- Baking: Remove the rolls, preheat to 350°F (175°C), and bake for 25–30 minutes until they are golden brown and “spring” back when touched.
6. The Vanilla Bean Finish
While the rolls are cooling slightly, whip your butter and cream cheese for the frosting. Add the powdered sugar slowly, then finish with the vanilla.
The Best Part: Spread that icing while the rolls are still warm. It will melt slightly into the crevices, creating that signature “gooey” bakery finish.
These are absolute heaven fresh out of the oven, but if you have leftovers, don’t leave them on the counter! Gluten free bread products can dry out fast. I like to wrap individual rolls and pop them in the microwave for 15 seconds the next morning. It brings that “freshly baked” softness right back to life!

Tips for Success, Gluten Free Cinnamon Rolls :
- Use a stand mixer: The dough is sticky hand mixing won’t cut it.
- Soft butter is key: Cold butter will tear the dough when spreading the filling.
- Slice with floss: Knives squish the rolls; floss gives clean cuts.
- Warm proofing: Gluten free flour is heavy help the yeast by letting rolls rise in a warm oven.
Dairy Free & Vegan Variations, Gluten Free Cinnamon Rolls :
- Dairy free: Swap butter + cream cheese for vegan versions.
- Vegan: Use vegan butter, vegan cream cheese, and a vegan egg replacer.
Storage & Reheating
- Store covered at room temp for 1–2 days, or refrigerate for up to 5 days.
- Reheat a roll in the microwave for 15–20 seconds to make it gooey again.
- Can freeze baked rolls (unfrosted) for up to 2 months.
FAQs
Can I use active dry yeast?
No, this recipe only works with instant yeast.
Can I use cup-for-cup flour?
Not recommended. Only Bob’s Red Mill Gluten Free Bread Mix gives the right texture.
Can I make Gluten Free Cinnamon Rolls overnight?
Yes! Let rolls rise in the pan, then cover and refrigerate. Bring to room temp before baking.
See more gluten free Baking recipes :
Gluten Free Sugar Cookies | 3 Secrets for Soft Bliss
Soft Gluten Free Pretzels (Bakery Style at Home)
Classic Gluten Free Apple Pie (with Buttery, Flaky Crust)
Gluten Free Angel Food Cake | 3 Secrets to Perfect Fluff
Essential Baker’s Notes for the Perfect Gluten Free Cinnamon Rolls :
To ensure your cinnamon rolls come out looking like they belong in a professional bakery window, keep these “golden rules” in mind. Gluten free yeast dough is a different beast than traditional dough, and these small details make all the difference between a “fail” and a “win.”
1. The Yeast & The Mix
- Instant is Best: Make sure you are using instant yeast (sometimes labeled as “Rapid Rise”). This recipe is designed for the fast-acting stuff; active dry yeast requires a different blooming process and won’t give you the same lift.
- Don’t Ditch the Mixer: The dough for these rolls will be much stickier than traditional wheat dough. Do not attempt to mix this by hand! A stand mixer with a dough hook is essential to build the necessary structure and “stretch” in the batter.
2. Mastering the Rise
- The “Warm Oven” Hack: Gluten-free dough can be stubborn when it comes to rising. To give it a boost, turn your oven to its lowest setting for a few minutes, then turn it off. Place your rolls inside with the door cracked slightly. This creates a cozy, draft-free environment that helps the rolls double in size beautifully.
- The Overnight Option: If you want fresh rolls for breakfast without the early wake-up call, you can prep these the night before! Simply let them rise in the pan, cover them tightly, and refrigerate overnight. The next morning, let them sit at room temperature for 30 minutes while the oven preheats, then bake as usual.
3. Dairy Free Success
- Seamless Swaps: If you are avoiding dairy, don’t worry this recipe is very forgiving. Simply use high-quality vegan butter (the sticks work better than the tubs for the filling) and your favorite vegan cream cheese. The moisture levels stay almost identical, so you won’t lose that signature “goo.”
Final Thoughts: Your New Favorite Tradition
These gluten-free cinnamon rolls are truly everything you’ve been craving: soft, fluffy, gooey, and topped with that dreamy vanilla bean icing. I know how hard it is to find a recipe that actually delivers on its promises, but this one is the real deal.
Whether you’ve been gluten-free for years or you’re just baking for a friend, these rolls will quickly become a favorite in your kitchen. There’s no need to settle for dry, crumbly substitutes when you can have a warm, pillowy roll that tastes even better than the bakery version.
So grab your mixer, put on your favorite playlist, and let’s get baking!