There’s something magical about a hot pizza fresh from the oven, golden crust, melted cheese, and that irresistible smell filling your kitchen. But if you’ve ever tried a gluten free pizza that turned out dry or dense, you know how disappointing it can feel.
This recipe changes that.
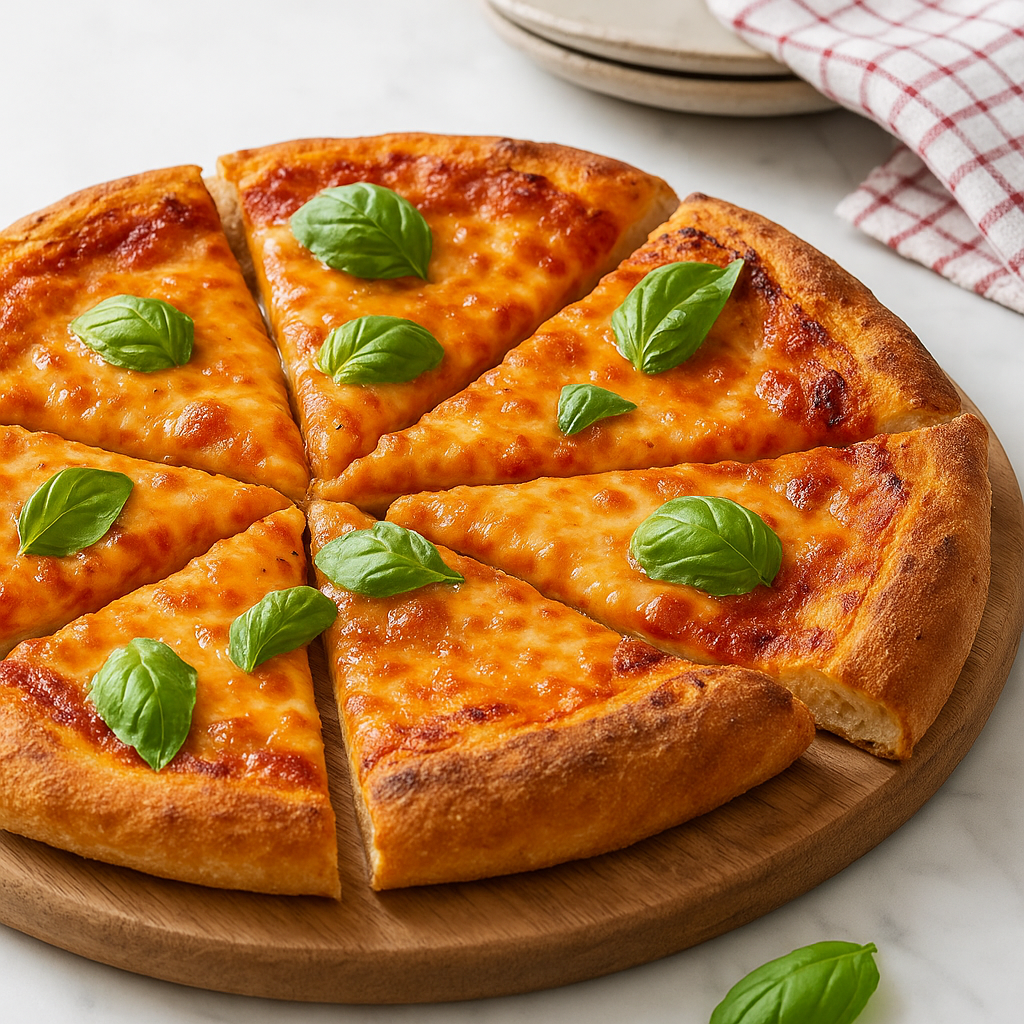
It’s soft and chewy inside, crisp around the edges, and beautifully golden, the kind of pizza you’ll actually look forward to every week. No complex flour blends, no confusion, just simple ingredients that work.
Pizza night is officially back on the menu, gluten free, family approved, and absolutely delicious.

Why You’ll Love This Gluten Free Pizza
- Perfectly crisp on the outside, soft and chewy inside
- 100% gluten free and safe for celiacs
- Simple, wholesome ingredients (no strange flours!)
- Ready in about an hour
- Works with any toppings you love, from classic Margherita to veggie-loaded creations
- Affordable, reliable, and tastes like real pizza
Key Ingredients & Why They Work (Detailed Version)
The secret to a gluten free pizza that actually feels like pizza lies in balance, a mix of flours that bring structure, chew, and flavor, held together by clever natural binders. Here’s how each part plays its role:
Millet Flour, The Backbone
Millet flour provides structure and a slightly nutty taste that grounds the crust. It’s rich in magnesium and fiber, making it not only sturdy but nourishing.
In this recipe, millet acts as the main “body” flour, it gives the dough strength so it holds together when stretched and baked. Without it, the crust would feel too delicate or gummy.
Pro Tip: If you can’t find millet flour, finely ground brown rice flour makes a good backup, though it yields a slightly firmer texture.
Sorghum Flour, The Softness Maker
Sorghum brings tenderness and a touch of natural sweetness. It prevents the dough from drying out and mimics the elasticity that gluten usually gives.
It’s what keeps your crust from turning “cardboard like” that dreaded gluten-free problem. Together with millet, it forms a beautiful balance of structure and softness.
Why It Matters: Sorghum absorbs moisture slowly, which means your crust stays soft even after cooling.
Tapioca Starch, The Chewy Magic
This ingredient is the texture hero. Tapioca starch gives your pizza that stretchy, chewy bite, the kind that lets you fold a slice without it snapping.
It also helps the crust puff slightly in the oven, creating little air pockets that feel just like traditional wheat dough.
Pro Tip: Don’t replace tapioca with cornstarch, you’ll lose the elasticity and crispness combo that makes this crust shine.
Whole Psyllium Husk, The Natural Binder
This is the gluten free secret weapon. Psyllium husk traps water and forms a gel, creating flexibility and strength in the dough.
It replaces gluten’s binding role, so your pizza can stretch, rise, and hold toppings without breaking apart.
Important: Always use whole psyllium husk, not powder. The powder absorbs too much water and can make your dough dry or rubbery.
Sugar & Yeast, The Rise & Flavor Team
A small amount of sugar feeds the yeast, helping it bloom and create those tiny air bubbles that make your crust light.
Yeast also adds that classic “pizzeria” aroma and flavor, a subtle fermented note that makes gluten-free pizza taste like the real deal.
Apple Cider Vinegar, The Secret Softener
Just a splash of vinegar reacts gently with the starches, improving stretch and keeping the crust tender.
It also balances the dough’s pH, helping yeast work better and adding a subtle tang that deepens the flavor, you won’t taste the vinegar, but you’ll feel its effect.

Step by Step: How to Make the Perfect Gluten Free Pizza
1. Make the Psyllium Gel
In a bowl, whisk together 15g whole psyllium husk and 420g lukewarm water. Let it rest for 30–45 seconds until a loose gel forms.
2. Combine the Dry Ingredients
In a large mixing bowl (or stand mixer), whisk together:
120g millet flour, 115g tapioca starch, 80g sorghum flour, 15g sugar, 6g instant yeast, and 6g salt.
3. Mix the Dough
Add 8g olive oil and 8g apple cider vinegar to your psyllium gel, stir, then pour into the dry mixture. Mix or knead until smooth, the dough should be soft, sticky, and elastic.
Tip: Don’t add more flour, even if it feels sticky! That’s how it stays chewy.
4. Pre-Shape & Divide
Turn the dough onto a lightly floured surface. Form into a ball, then divide into two equal pieces. Keep one covered while you shape the other.
5. Shape the Pizza Bases
On a well floured surface, gently press and stretch the dough into a circle (10–11 inches). Leave a slightly raised edge for the crust.
6. Proof the Bases
Cover both with a tea towel and let them rise in a warm spot for about 45–60 minutes, until puffy.
7. Preheat the Oven
Place a baking stone or steel on the middle rack and preheat to 475°F (250°C), this step is crucial for a crisp crust.
8. Assemble Your Pizza
Brush the crust edge with olive oil, then add sauce, cheese, and toppings.
9. Bake to Golden Perfection
Slide onto your preheated stone or sheet and bake 15–18 minutes, until deep golden and bubbling.
10. Slice, Serve & Celebrate!
Add fresh basil, cut into wedges, and serve right away.

Chef’s Tips for Perfect Results
- Don’t rush preheating. The hotter your stone, the crispier your crust.
- Olive oil on the edges = golden magic.
- Use parchment paper if you’re nervous about sliding the dough.
- Rest before slicing. One minute makes all the difference in texture and cheese stretch.
Variations & Toppings
- Vegan: Use vegan mozzarella or cashew cheese.
- Grain Free: Replace millet with almond flour (add 1 extra tablespoon tapioca starch).
- Mediterranean: Add olives, cherry tomatoes, and feta.
- Kids’ Favorite: Make mini pizzas with fun toppings like corn, ham, or pineapple.
Storage & Reheating
- Fridge: Store leftovers in an airtight container up to 3 days.
- Freezer: Pre bake crusts, wrap tightly, and freeze for up to 2 months.
- Reheat: Bake directly on oven rack at 400°F (200°C) until warm and crisp.
Frequently Asked Questions
Can I make the dough ahead of time?
Yes! Store it in the fridge for up to 24 hours. Let it come to room temperature before shaping.
Do I really need psyllium husk?
Absolutely. It replaces gluten’s structure, without it, your crust may crack or dry out.
What if I don’t have a pizza stone?
Flip a baking tray upside down, it works perfectly.
Can I make it dairy-free?
Yes! Simply use your favorite dairy free cheese alternative.
See more Gluten Free Recipes :
Gluten Free Fried Chicken (Crispy KFC Style Recipe)
Gluten Free Chicken Nuggets | Crispy, Easy & Family Approved
Gluten Free Lasagna Noodles | Easy Cheesy Comfort Recipe
Gluten Free Fried Rice | Easy 30 Minute Takeout Style Meal
Conclusion
There’s nothing quite like the comfort of homemade pizza, warm, golden, and made with love. This gluten free version proves you don’t need wheat to enjoy a perfect slice. With its crisp edges, soft chew, and simple ingredients, it’s the kind of recipe that turns pizza night into something special again. Whether you top it with classic mozzarella and basil or load it up with veggies, this crust is your new go-to. Take your time, enjoy the process, and let your kitchen smell like comfort, one slice at a time.