From Crumbly Messes to Bakery Perfection I’ll be honest: when I first started my gluten free journey, my kitchen felt like a graveyard for expensive flour blends. I spent months pulling trays out of the oven only to find “cookies” that were either dry as sand, crumbly as a cracker, or flat, oily puddles. It was heartbreaking to miss out on that classic comfort, and I almost convinced myself that a soft, chewy Gluten Free Chocolate Chip Cookies was a myth.
But I refused to settle for “good enough.” After countless failed batches, I finally found the “holy grail” combination. These Gluten Free Chocolate Chip Cookies are the redemption I was looking for. They have those crisp, golden brown edges, a gooey, melt-in-your-mouth center, and a buttery richness that makes you forget gluten was ever an issue.
The Secret to the “Impossible” Texture The magic isn’t in luck, it’s in the blend. By pairing nutty oat flour with a high quality gluten-free all-purpose mix, we solve the “crumbly cookie” problem forever. The oat flour provides that essential chew and structure that most GF recipes lack.
Best of all? This is a no-chill cookie recipe. You can go from a craving to a warm, melty bite in under 20 minutes using basic pantry staples. Whether you need a dairy free treat using Earth Balance or a classic butter filled indulgence, these cookies hit that nostalgic “bakery-style” sweet spot every single time.
")
Why This is the “Holy Grail” of Gluten Free Chocolate Chip Cookies
- The End of “The Crumble”: We’ve all had those GF cookies that turn into dust the moment you take a bite. These stay soft and bendable in the center for days, thanks to a moisture-locking ratio of ingredients.
- The “Secret Weapon” Flour Blend: By mixing a standard all-purpose GF flour with nutty oat flour, we mimic the protein structure of wheat. This creates that “classic chew” and a deep, toasted flavor that you just can’t get from rice flour alone.
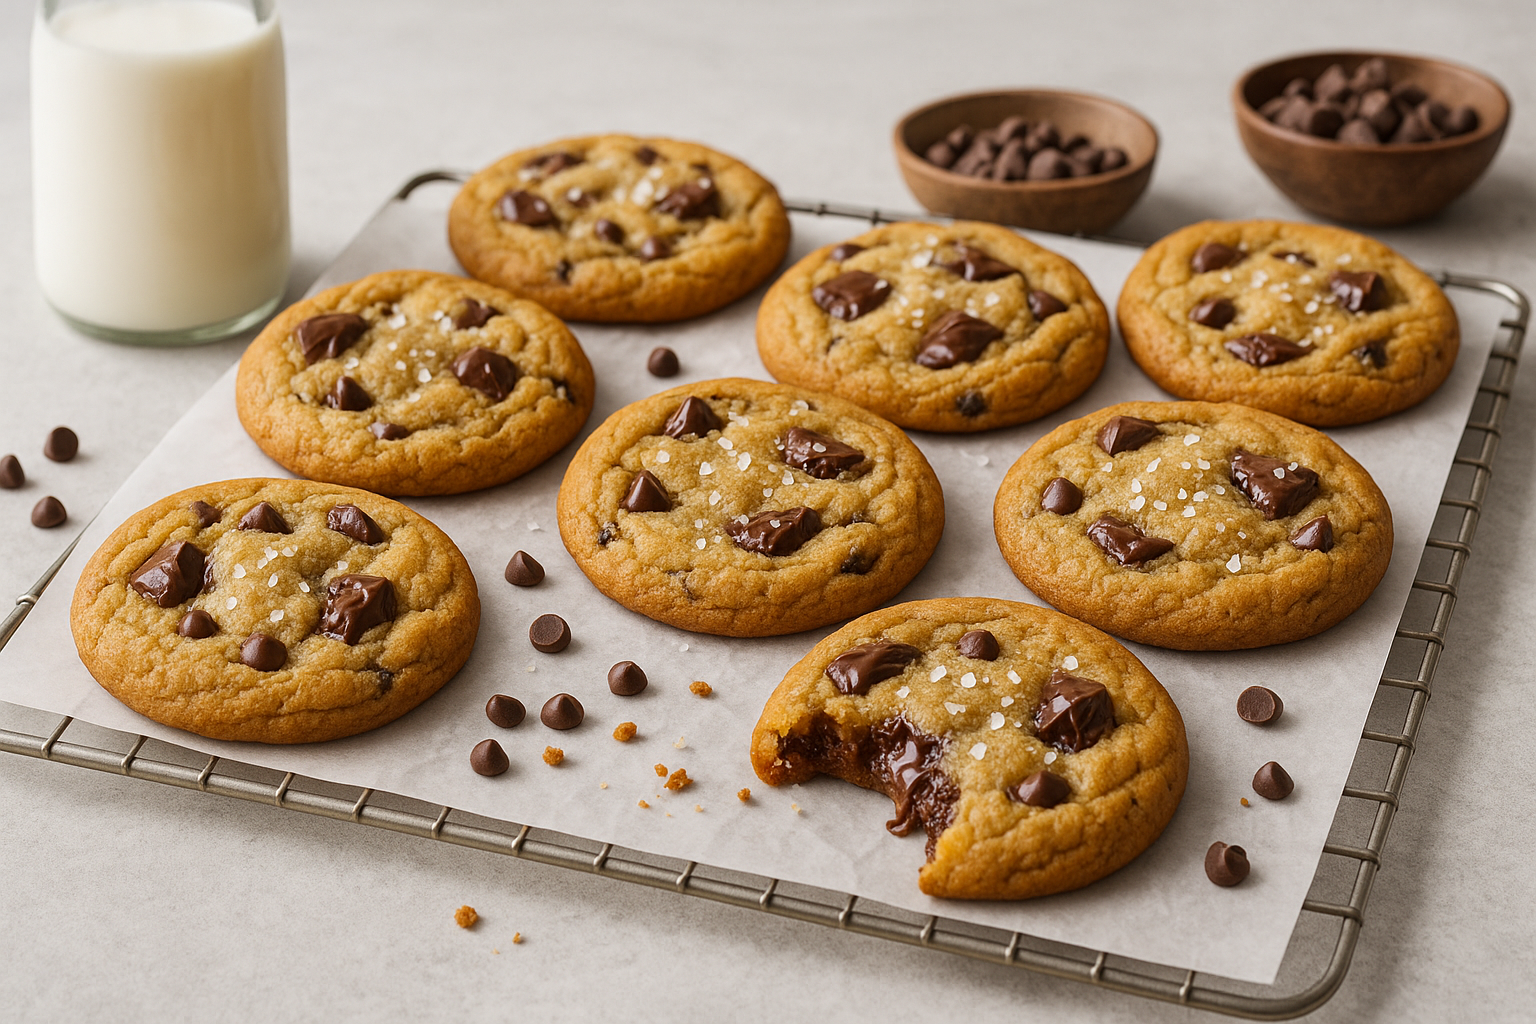
- Customizable “Boutique” Style: These are easily adapted for any diet. Use dairy-free chocolate chips or plant-based butter (like Earth Balance) for a vegan-friendly option. Pro Tip: Finish them with a sprinkle of Maldon flaky sea salt for that high-end, $6-a-cookie bakery look!
- Zero Waiting (No-Chill Recipe): Most “good” GF recipes require 24 hours in the fridge. Not this one. You can go from a craving to a warm, gooey cookie in 30 minutes flat perfect for late-night snacks or last-minute school treats.
- The “Stealth” Gluten-Free Treat: These are so authentic that they pass the “non-GF” test. It’s the perfect one-batch recipe for parties, no one will know they’re eating a “special” dessert.
Baker’s Secrets: How to Get That Perfect “Bakery Heft”
I didn’t learn these tricks overnight I learned them through dozens of failed, flat batches. If you want a cookie that looks like it came from a $7-a-piece boutique in NYC, follow these rules:
- The “Flash Chill” Trick: Even though this dough can be baked immediately, if you want a thick, soft-baked cookie that doesn’t spread into a puddle, chill your scooped dough balls for just 15 minutes while your oven preheats. This solidifies the butter and ensures a tall, professional rise.
- Grams > Cups (The Accuracy Rule): In the world of gluten-free baking, a “cup” can vary by up to 30 grams depending on how you scoop it! For that perfectly chewy center, use a digital kitchen scale. Measuring in grams is the 1 way to avoid “dry and bready” cookies.
- The “Parchment Paper” Essential: Never bake directly on a naked cookie sheet! Using parchment paper (or a silicone mat) creates a buffer that prevents the bottoms from burning before the centers are set. Plus, it makes cleanup a 5-second job.
- Ingredient Swaps that Actually Work: * For the Chewiest Bite: Use Light Brown Sugar, the molasses content is the secret to moisture.
- For Dairy-Free: Use Earth Balance sticks or Miyoko’s Vegan Butter. Avoid “tub” margarines, as they contain too much water and will make your cookies thin and oily.
- The “Cookie Scoot”: As soon as the cookies come out of the oven, take a large circular glass or cookie cutter and gently “scoot” it around the warm cookies in a circular motion. This rounds out the edges for that perfectly symmetrical, professional look.
Try more Gluten free dessert recipes :
Love gluten free baking? Try my :
Gluten Free Pancake Recipe or Gluten Free Croissant Recipe next!
Ingredients You’ll Need For Gluten Free Chocolate Chip Cookies :
- ½ cup (110 g) unsalted butter, melted (or vegan butter such as Earth Balance)
- ½ cup (110 g) dark brown sugar, packed
- ½ cup (100 g) granulated sugar
- 1 tsp vanilla bean paste (or 2 tsp vanilla extract)
- 1 large egg + 1 egg yolk, room temperature
- 1 cup + 1 tbsp (150 g) all-purpose gluten free flour blend with xanthan gum
- ½ cup (60 g) gluten free oat flour (or substitute brown rice flour or almond flour)
- ¼ tsp baking soda
- ¼ tsp salt
- ½ cup (80 g) bittersweet chocolate, chopped
- 1 cup (160 g) semisweet chocolate chips + a handful for topping
- Sea salt flakes, for sprinkling
")
How to Bake the Ultimate Gluten Free Chocolate Chip Cookies : Step by Step
Step 1: The “Toffee Like” Base
In a large bowl, whisk together your melted butter, dark brown sugar, and granulated sugar.
- Real Experience Tip: Whisk until the mixture looks like smooth, shiny liquid toffee. Adding the egg and extra egg yolk at room temperature is the secret to that “fudgy” center. If the egg is cold, it will seize the butter, so give it 15 minutes on the counter first!
Step 2: The “Precision” Dry Mix
In a separate bowl, whisk your GF all-purpose flour, oat flour, baking soda, and salt.
- The “Chew” Factor: If your flour blend doesn’t have it, don’t forget the xanthan gum. This is what replaces the “stretch” of gluten and keeps your cookies from crumbling into dust.
Step 3: Folding & The Chocolate “Pools”
Gently fold the dry ingredients into the wet until no flour streaks remain.
- The Pro Choice: Instead of just using basic chips, stir in chopped bittersweet chocolate chunks along with your semisweet chips. The chopped chocolate creates “pools” of melty goodness that look incredible in photos.
Step 4: The “Anti-Puddle” Chill
Cover and chill for at least 30 minutes.
- Why this is a must: Chilling the dough allows the rice flours to hydrate (removing any grit) and prevents the butter from melting too fast in the oven. This is how you get a thick, soft-baked cookie instead of a flat puddle.
Step 5: The Perfect Scoop
Preheat your oven to 350°F (175°C) and line your sheet with parchment. Scoop roughly 2 tablespoons of dough per ball.
- Spacing Rule: Give them at least 2 inches of space. These cookies have a beautiful “heft” and need room to breathe. Bake for 10–12 minutes, pull them out when the edges are a deep golden brown but the centers still look slightly “underdone.” They will firm up as they cool!
Step 6: The “Gourmet” Finish
While the cookies are still hot and soft, press a few extra chocolate chips into the tops and add a generous pinch of flaky sea salt.
- The 5-Minute Rule: Let them rest on the hot pan for 5 minutes. This “carry-over cooking” finishes the center perfectly without drying out the edges.
FAQs
Q: Can I freeze the dough?
Yes! Roll into dough balls, freeze on a tray, then store in a bag. Bake straight from frozen, adding 1–2 minutes to bake time.
Q: How do I make these Gluten Free Chocolate Chip Cookies dairy free?
Swap the butter with vegan butter (like Earth Balance) and use dairy free chocolate chips.
Q: What’s the best gluten free flour for cookies?
A quality all purpose gluten free flour blend, like Bob’s Red Mill, works best.
Storage & Freezing Tips
- Store in an airtight container for 3–4 days.
- Freeze baked cookies or dough balls for up to 2 months.
Notes: The Science of the Perfect Gluten Free Chocolate Chip Cookies :
1. The “Certified” Oat Flour Rule
In the US, cross-contamination is a major concern.
- Real Experience: Always ensure your oat flour is Certified Gluten-Free (like Zeglo or Bob’s Red Mill). Even though oats are naturally gluten free, they are often processed in facilities with wheat. If you’re baking for someone with Celiac disease, this one detail is the difference between a safe treat and a health risk.
2. Why Dark Brown Sugar is Non Negotiable
Most classic recipes call for light brown sugar, but I’ve found that Dark Brown Sugar is the secret to the best Gluten Free Chocolate Chip Cookies .
- Why it works: Dark brown sugar has a higher molasses content. Since gluten-free flour tends to be thirstier and drier, the extra moisture in dark brown sugar keeps the centers fudgy for days instead of turning into a “cookie rock” by the next morning.
3. The “Carry-Over Cooking” Window
One of the biggest mistakes is overbaking.
- The Secret: Gluten-free cookies look “raw” in the middle when they are actually done. If the edges are set and golden, take them out! They will continue to cook on the hot baking sheet for 5–7 minutes after leaving the oven. This “carry-over” period is what creates that signature bakery-style texture.
4. Scooping for Success
For that perfectly uniform look you see in professional bakeries:
- The Tool: Use a triggered cookie scoop (size #40 or 1.5 tablespoons). Not only does this make the process faster, but it ensures every cookie is the same size, meaning they all finish baking at the exact same second. No burnt edges on the small ones!
The Final Bite: Your New Favorite Gluten Free Chocolate Chip Cookies :
There is a specific kind of magic that happens when you take that first bite of a warm, salt-topped cookie and realize you never have to settle for “cardboard” desserts again. These bakery style Gluten Free Chocolate Chip Cookies aren’t just a recipe; they are proof that your kitchen can be a place of joy and indulgence, not just dietary restrictions.
I Want to Hear Your “Success Story”!
I know the struggle of the “bad times” in gluten free baking, so when you finally nail these, I want to celebrate with you!
- Did you go classic or add your own twist? Drop a comment below and tell me how your first batch turned out.
- The “Pull-Apart” Test: If you post your gooey, melty cookie pull on Instagram or TikTok, tag me #GFsnack—I love seeing those thick, fudgy centers in action!
Now, go grab a cold glass of milk (dairy free or otherwise) and enjoy the best gluten free cookie of your life. You’ve earned it!
Happy baking, and here’s to many more flaky, gooey, 100% gluten free wins!